Jira Software Cloud: A Step-by-Step Setup Guide for Teams
Need a smoother team workflow? Learn to set up jira software cloud, configure projects, permissions, workflows, and boards step by step. Read now.
Setting up Jira Software Cloud can feel simple until your team faces unfamiliar workflows, permission choices, scattered issue types, and unclear ownership. A rushed setup often creates noisy boards, confusing reports, and work that quietly disappears between sprints.
That frustration grows when every team member uses a different status, when notifications become distracting, or when project settings no longer match the way your team actually works. Fixing those problems later can take longer than planning the setup properly.
But here's the truth: you can create a useful Jira Software Cloud workspace by following a clear sequence. Start with your team’s workflow, configure only the essentials, test the experience with real work, and improve the setup after your first sprint.
How to Set Up Jira Software Cloud Step by Step
Jira Software Cloud is Atlassian’s hosted project management platform for planning, tracking, and reporting on software work. A practical setup includes creating a project, choosing a workflow, configuring access, building a board, and testing the complete process.
Use the steps below in order. Each step reduces a common setup risk before you invite the entire team.
-
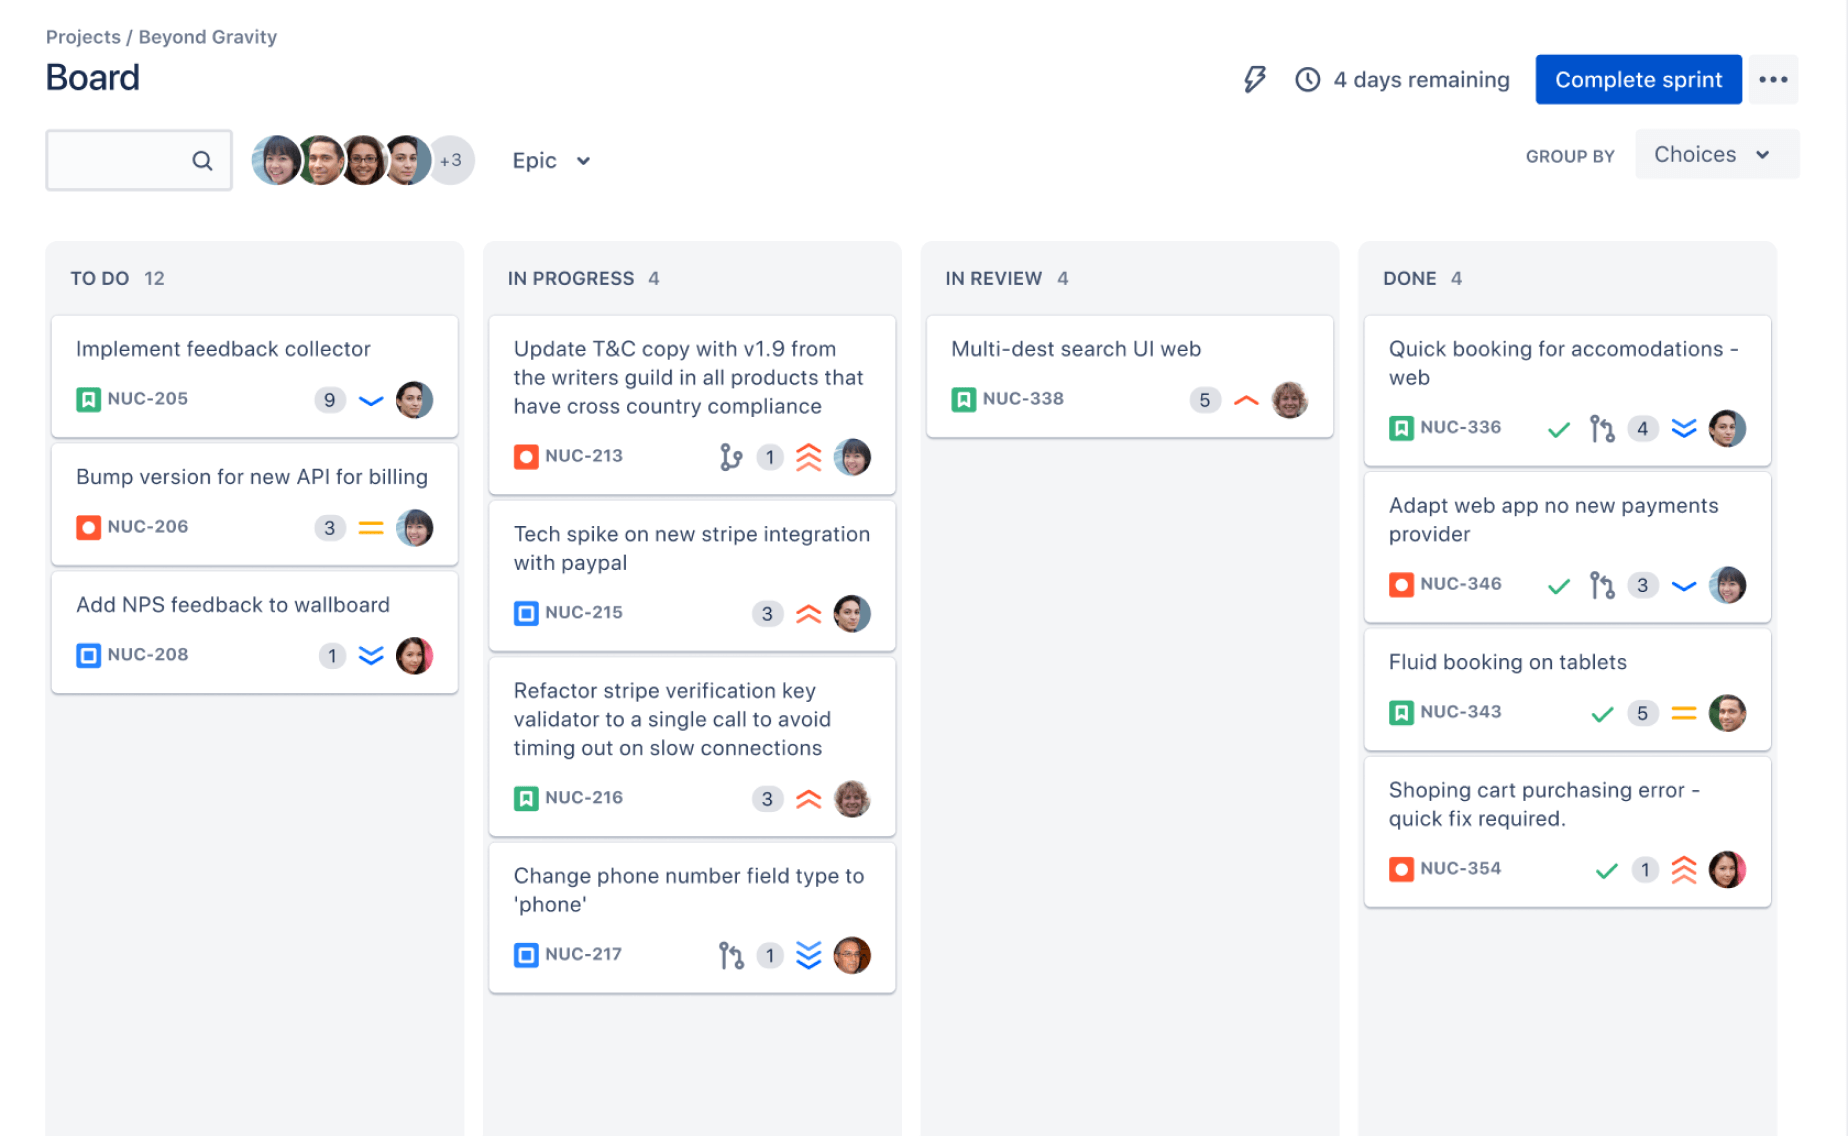
Create Your Atlassian Site and Jira Workspace
Start by creating or joining your Atlassian organization. Choose a clear site name that your team will recognize in browser tabs, invitations, and notifications.
Keep the site name connected to your company or department. For example, northstar.atlassian.net is easier to recognize than a temporary name created for testing.
During the initial setup, select the software project option. Jira may ask about your team size, role, and preferred project style. These answers help shape the initial experience, but you can change most settings later.
-
Choose a Project Template
Select a template that resembles your team’s delivery process. A Scrum template fits teams working in time-boxed sprints, while a Kanban template suits continuous flow.
For example, a product team releasing every two weeks may start with Scrum. A support engineering team handling incoming fixes may find Kanban more natural.
Do not choose a template because it sounds advanced. Pick the one that requires the fewest changes to reflect how your team already plans and completes work.
-
Define the Project Name, Key, and Owner
Give the project a name that describes the product, service, or team. Then choose a short project key, such as PAY for Payments or MOB for Mobile.
The key appears in issue IDs, so select something that will still make sense after the team grows. Avoid personal initials unless the project truly belongs to one person.
Assign a project owner or administrator. This person should understand the workflow and be available to answer questions about permissions, fields, and reporting.
-
Invite Team Members and Set Access
Invite people by email or add them through your organization’s identity management process. Give each person the smallest access level needed for their work.
A developer may need permission to create, edit, transition, and comment on issues. A stakeholder may only need to view progress and add feedback.
Start with a small pilot group if the project is new. Five to eight people can test the workflow before you introduce it to a larger department.
-
Design the Issue Types
Issue types describe the kinds of work your team tracks. Common choices include epic, story, task, bug, and sub-task.
Keep the list short. If every team invents a special issue type, reporting becomes harder. A product team might use:
- Epic for a large outcome, such as a redesigned checkout.
- Story for a user-facing capability.
- Task for technical or operational work.
- Bug for a defect that needs correction.
- Sub-task for a defined part of a larger issue.
Use labels or components for additional classification. For example, a bug can carry the labels mobile and payment without creating several nearly identical issue types.
-
Configure Statuses and Workflow Transitions
A workflow shows how an issue moves from creation to completion. Begin with the smallest useful sequence, such as To Do, In Progress, In Review, and Done.
Here's why: every extra status creates another decision for the team. A ten-step workflow may look precise, yet people often skip statuses when the differences are unclear.
Define what “Done” means before you publish the workflow. For a software team, completion may require code review, automated checks, testing, and product approval.
Use transition rules carefully. Requiring a reason when reopening a defect can improve visibility, while requiring too many fields can slow routine work.
-
Build the Board
Configure columns to match the workflow. A basic Kanban board might include Backlog, Selected, In Progress, Review, Testing, and Done.
For Scrum, decide which work appears in the active sprint and which stays in the backlog. Make the board easy to scan during daily meetings.
Limit work in progress where bottlenecks appear. If code review regularly fills up, a review limit can encourage the team to finish existing work before starting something new.
-
Set Up the Backlog and First Sprint
Create a small set of realistic issues rather than importing every possible idea. Each issue should explain the expected outcome, ownership, and completion conditions.
For a login improvement, the issue might include acceptance criteria such as password reset behavior, error messaging, and mobile testing.
Prioritize the backlog with the product owner or project lead. Then select a manageable amount of work for the first sprint. The first sprint should teach you whether the workflow works in practice.
-
Configure Fields, Screens, and Issue Details
Use standard fields where possible. Summary, description, priority, assignee, reporter, sprint, and due date cover many common needs.
Add custom fields only when the information supports a decision, report, or handoff. A field such as “Customer impact” may help support teams prioritize defects. A field that nobody reviews only increases maintenance.
Keep descriptions consistent with a short template. You can include the problem, expected result, acceptance criteria, and links to relevant discussions.
-
Connect Notifications and Integrations
Configure notifications so important changes reach the right people without overwhelming everyone. A developer may need assignment and review alerts, while an executive may only need sprint or release summaries.
Connect tools that your team already relies on, such as chat, source control, testing, or deployment services. Test each connection with a low-risk issue before relying on it during a release.
Review automation rules carefully. An automation that assigns every new bug to one person can create an invisible queue and distort workload reports.
-
Test the Full Workflow Before Launch
Create a test issue and move it through every stage. Check the board, notifications, permissions, fields, reports, and issue history.
Ask two people with different roles to repeat the process. A developer and a product manager may notice different problems.
Record each confusing step and fix the highest-impact issues first. Then run a short onboarding session using a real example instead of a feature tour.
-
Review the Setup After the First Sprint
Hold a short review after the first sprint or two weeks of active work. Ask which statuses were unclear, which fields were ignored, and where work became delayed.
Compare planned work with completed work. If the team repeatedly carries work forward, the sprint may be too large, the issues may be too broad, or the workflow may hide a bottleneck.
Change one or two things at a time. Small adjustments make it easier to understand whether a configuration change improved delivery.
Plan the Jira Structure Before You Configure It
A clean Jira workspace starts with a clear operating model. Decide how your team separates products, projects, releases, and work types before changing settings.
For example, one product may use a single project with components for web, mobile, and API work. Another organization may need separate projects because teams have different permissions or release cycles.
Here's a practical planning exercise: write down the work your team receives, the decisions it makes, and the reports leaders need. Then map each need to an issue type, field, label, or board filter.
This prevents a common mistake: adding a new project whenever a new work category appears. Sometimes a component or label is enough.
Use a Simple Hierarchy
A useful hierarchy might look like this:
- Project: the product or service being managed.
- Epic: a major outcome or initiative.
- Story, task, or bug: a deliverable piece of work.
- Sub-task: a smaller activity needed to complete the item.
Consider a payments product. “Improve checkout reliability” could be an epic. “Retry failed card authorization” could be a story. “Add monitoring coverage” could be a task beneath the same initiative.
Configure Workflows That Reflect Real Team Behavior
Your workflow should describe meaningful control points, not every conversation your team has. A status deserves a place on the board when it changes ownership, risk, or readiness.
Let me explain: “In Progress” tells you work has started. “Ready for Review” tells you the creator has finished a meaningful step and another person must act. That distinction helps a team identify waiting work.
Compare two approaches. A small team may use To Do, In Progress, Review, and Done. A regulated team may need separate testing and approval stages. Both can work when each status has a clear purpose.
Write Entry and Exit Rules
For each status, define what allows an issue to enter and leave it. An issue may enter Review only after implementation and local testing are complete.
It may leave Review after another team member approves the change and automated checks pass. These rules can live in the issue description, team handbook, or sprint agreement.
Avoid Workflow Bottlenecks
Look for columns where work accumulates. If twelve issues sit in Testing while only one person can test them, the problem is capacity, sequencing, or issue size.
Changing the status name will not solve that bottleneck. You may need smaller issues, earlier testing, temporary support, or a work-in-progress limit.
Organize Boards, Backlogs, Sprints, and Releases
Boards answer “What is happening now?” Backlogs answer “What could happen next?” Releases answer “What outcome are we preparing to deliver?” Keep those purposes distinct.
A Scrum team might plan a two-week sprint, review completed work, and refine the next group of issues. A Kanban team may pull work continuously and monitor cycle time instead.
The best part? You do not need to copy another team’s cadence. Choose a planning rhythm that matches your delivery pattern.
Keep the Backlog Usable
Review the backlog regularly. Close obsolete ideas, merge duplicates, clarify vague requests, and rank the items that matter most.
A backlog with 2,000 unreviewed issues creates the appearance of opportunity while hiding priorities. A smaller, reviewed backlog gives the team a clearer next step.
Use Releases as Communication Tools
Versions or releases can group work around a launch, maintenance cycle, or customer commitment. Add an issue to a release only when the team understands the connection.
For instance, a release called “Mobile Checkout 4.2” might include performance fixes, accessibility changes, and payment error improvements. A release report can then show remaining work and unresolved risks.
Set Permissions, Notifications, and Automation Carefully
Configuration choices affect trust. People need to know who can change priorities, close issues, edit workflows, and view sensitive work.
Start with role-based access rather than granting broad administrative rights. Review permissions when someone changes teams or responsibilities.
Notifications require the same restraint. If every comment, field change, and transition triggers an email, important alerts become easier to miss.
Use Automation for Repetitive Actions
Automation works well for predictable events. Examples include assigning a newly created bug to a triage queue, adding a label when an issue enters a support component, or notifying a release lead when a critical defect appears.
Test rules with a limited scope first. Include an owner and review date so the team can remove rules that no longer fit.
Protect Reporting Quality
Reports become misleading when teams skip statuses, leave assignees blank, or change priorities without explanation. Set expectations during onboarding and review the habits behind the numbers.
For example, a sprint report may show low completion because issues are too large. Breaking work into smaller pieces can reveal progress more accurately.
Train the Team and Improve the Setup
A technically correct workspace can still fail if people do not understand how to use it. Teach the process through a real issue, from creation through completion.
Show where a person should ask a question, how to describe acceptance criteria, when to assign work, and what “Done” means. Keep the first session practical and short.
You might be wondering: how often should you change the setup? Review it after the first sprint, then quarterly or whenever the team’s delivery model changes.
Create a Team Working Agreement
Write down a few operating rules:
- Who creates and prioritizes backlog items?
- When does an issue move into active work?
- What must be complete before review?
- Who can change priorities during a sprint?
- When should a blocked issue be escalated?
These agreements reduce arguments about process because the team can refer to shared expectations.

Measure Practical Outcomes
Track whether the workspace helps the team deliver. Useful signals include cycle time, sprint completion, reopened defects, blocked work, and aging issues.
Do not chase a perfect metric. Use reports to ask better questions. If cycle time rises, investigate waiting, scope, dependencies, and review capacity.
Jira Software Cloud Alternative: ONES.com
ONES.com is a unified platform for project management and knowledge management, powered by AI through ONES Assistant. ONES Project is its project management product and can serve as a Jira alternative, while ONES Wiki is available separately for knowledge management.

The platform may suit teams that want Jira-compatible workflows, built-in reporting, and self-hosted deployment options without assembling a large collection of plugins. You can use ONES.com through Cloud, On-Premise, Private Cloud, or Air-gapped deployments.
Value Proposition
ONES.com gives teams a way to manage planning, delivery, reporting, and shared knowledge within a connected platform. Its deployment choices also support teams that need on-premise or restricted-network environments.
Core Capabilities
- Plugin sprawl creates maintenance work. ONES Project includes reporting, custom workflows, custom fields, sprint management, and automation. Result: your team can handle common delivery needs with fewer separate extensions.
- Teams hesitate when moving away from familiar workflows. ONES Project supports Jira-compatible workflows and familiar project structures. Result: your team can evaluate a Jira alternative without rebuilding every process from scratch.
- Self-hosting can create feature gaps. ONES.com provides full feature parity between its cloud and self-hosted versions. Result: deployment requirements do not automatically mean giving up core capabilities.
- Restricted environments limit ordinary cloud services. Air-gapped deployment supports teams that cannot connect project operations to the public internet. Result: sensitive engineering work can remain inside a controlled network.
- Changing requirements make rigid workflows difficult. Custom workflows and fields let teams reflect different delivery stages and information needs. Result: your boards can match actual work instead of forcing every project into one process.
- Leadership needs progress visibility without manual reporting. Built-in reporting turns project activity into views for progress, workload, and delivery review. Result: managers can spend less time assembling status updates.
- Teams need planning support across different delivery styles. Sprint management and automation support iterative planning and repeatable actions. Result: Scrum teams can manage sprint routines while other teams automate recurring transitions.
- Small teams want to evaluate a platform before expanding. ONES.com offers a free plan for up to 30 seats. Result: a team can test core project management capabilities with a defined group.
Application Scenarios
Scenario one: an engineering team moving from Jira. The team can recreate its issue types, statuses, sprint cadence, and reporting needs in ONES Project. It can then run one product team through a pilot before moving additional work.
Scenario two: a company with on-premise requirements. The company can select On-Premise or Private Cloud deployment while keeping the same core feature set available in the cloud version.
Scenario three: a restricted-network team. An air-gapped environment can support project tracking where internet connectivity is restricted. The team can keep planning, issue management, and reporting inside its approved environment.
Common Challenges When Setting Up Jira Software Cloud
Challenge: The Workflow Has Too Many Statuses
Problem: team members cannot tell when to move an issue, so work remains in the wrong column.
Solution: combine statuses with similar meanings and write a short entry and exit rule for every remaining stage.
Challenge: The Backlog Becomes a Storage Area
Problem: old ideas, duplicates, and vague requests make prioritization slow.
Solution: hold a regular refinement session. Close stale items, add acceptance criteria to important requests, and rank only work that may receive attention soon.
Challenge: Reports Do Not Match Reality
Problem: reports show progress that the team does not recognize, or they show poor performance because issues are too broad.
Solution: define completion clearly, break large issues into smaller deliverables, and review report assumptions during retrospectives.
Challenge: Notifications Become Distracting
Problem: people receive alerts for minor changes and begin ignoring all messages.
Solution: keep notifications for assignments, reviews, blockers, and high-impact changes. Move routine updates to dashboards or scheduled summaries.
Challenge: Access Becomes Difficult to Manage
Problem: people receive too much access, or new members cannot perform basic work.
Solution: create clear project roles, review permissions quarterly, and test access with representative accounts before launch.
FAQs About Jira Software Cloud Setup
What is the best first project template for a new team?
Choose Scrum when your team plans work in fixed sprints and reviews progress at regular intervals. Choose Kanban when work arrives continuously and priorities can change often. If you are unsure, begin with the simpler template and observe how the team actually works. You can adjust boards, workflows, and planning settings after the first delivery cycle.
How many statuses should a Jira workflow have?
Use enough statuses to show meaningful handoffs, waiting points, or approval stages. Many small teams can work effectively with four or five statuses. Add another stage only when it answers a practical question, such as “Is this waiting for review?” If people cannot explain when to use a status, remove it or combine it with a clearer stage.
Should I create separate Jira projects for every team?
Separate projects make sense when teams need different permissions, workflows, release cycles, or reporting boundaries. A single project may work better when teams share a product and follow the same process. Before creating another project, check whether components, labels, boards, or filters can provide the separation you need without splitting related work.
How should I test a new Jira setup?
Use a realistic issue and move it through creation, assignment, active work, review, completion, and reopening. Ask people in different roles to test it. Check permissions, notifications, board behavior, reports, and automation. A small pilot often reveals problems that are invisible during configuration, especially unclear transitions and excessive required fields.
Can I use a Jira alternative in a self-hosted environment?
Yes. Some teams choose a Jira alternative because they need on-premise, private cloud, or air-gapped deployment. ONES.com provides Cloud, On-Premise, Private Cloud, and Air-gapped options, with feature parity between its cloud and self-hosted versions. Evaluate workflow compatibility, reporting, permissions, migration support, and administration before making a decision.
Conclusion
A successful Jira Software Cloud setup starts with your team’s real delivery process. Create the project, choose a suitable template, define a small workflow, configure access, build a useful board, and test everything with realistic work.
But here's the truth: setup is only the beginning. Your team must review the first sprint, remove confusing steps, control notification noise, and keep the backlog useful.
If Jira’s plugin requirements, deployment model, or workflow limitations become difficult to manage, ONES.com offers another path. ONES Project provides project management capabilities as a Jira alternative, while its deployment options support cloud, self-hosted, private, and air-gapped environments.